
I have a sort of Bucket List for cooking. It isn’t really anything I’ve ever written down. It’s just one of those things that I’ve always kept in the back of my mind–and when I say always, I mean since 1993. Maybe I should write it down. That’s really neither here nor there at this very moment. The real point is that yesterday (and by yesterday, I mean last weekend when I I started writing this post) I finished something that I have always wanted to do , but have always been too worried would end up being a waste of time.
I made croissants. Me. I made them.
They took longer than I would have liked, but not as long as I thought they would. And–get this– they were pretty good.
If you, for some bizarre reason, decide that it’d be much more fun to make these than to go to a bakery and buy some, then there are a ton of blogs entries, YouTube videos, and recipes out there. This was a Daring Bakers’ Challenge for September, so there are A LOT of blog entries about making Julia Child’s croissants if that is the way you choose to go.
I went with the King Arthur Flour company’s recipe– mostly because I didn’t want to use oil in my recipe, and I really like King Arthur Flour (they do not know who I am, nor do they care– so no worries there)– it’s SO FLUFFY! The original recipe calls for salted butter, but since I thought it would be easier to form the square of butter that the recipe requires, I made my own…and forgot to salt it. Whoops.
This cooking endeavor was almost as intensive as that crazy dark chocolate cake I made back in April. Much like that trip into cooking craziness, this one was documented with poorly lit photos that are at all kinds of odd angles. It can be difficult to take photos in a dark kitchen while covered in flour and sticky dough. Please forgive me.

Croissants
mostly inspired by the recipe for Baker’s Croissants by King Arthur Flour
Ingredients:
Dough:
2 large eggs, room temperature
warm water
1/4 cup sugar, divided
5-1/2 to 6 cups all-purpose flour
2-1/4 tsp active dry yeast (1 packet)
1/4 tsp salt
2 tbsp butter, melted
Butter:
2 cups salted butter, room temperature (or if you’re going to be like me and make your own– 1 quart heavy whipping cream + 3/4 tsp salt)
Directions:
PART 1:
Begin the dough by making a “sponge.” Crack the 2 eggs into a large mixing cup. Add enough warm water to equal 2 cups.

Whisk the eggs and water together, then pour the mixture into a large mixing bowl. Add 1 tablespoon sugar to the mix, then 3 cups of the flour and the full amount of yeast.

Mix it until blended– it’s a sticky gloopy mess, so use a spoon or rubber spatula, not a whisk– then set it aside. See the notebook there with the blue chicken scratch? Those were my notes for this recipe. They covered four pages. Four.

If you’re crazy like me, this is a good time to make the butter.
Pour the entire quart of heavy cream into the bowl of a stand mixer that has been fitted with a wire whisk.

Cover the top of the stand mixer with plastic wrap (trust me), and turn the mixer on high.

The cream will go through several stages, and you’ll get to see that lovely butter-yellow color come through.


This looks ready, but it isn’t. Trust me.

You want to wait until the cream breaks, or when the butter separates from the buttermilk. It’s here that you’ll really be thankful for the plastic wrap.

If you start to hear a sloshing sound, turn your mixing speed down quickly!

I’m always in awe of this step. I don’t know why. It’s just really a neat physical change.

Take the butter out, and press it into a colander lined with paper towels.


Wrap the butter in the paper towels, and squeeze the excess liquid out. The colander is in the sink, by the way. I promise that I’m not squeezing the liquid out all over my counter!

You can save the buttermilk for another use or throw it away. I tossed mine because I couldn’t think of anything to do with it right away.

If you don’t have a stand mixer, you can use a hand mixer– I have a post from a long time ago on how to do that. Once you’ve drained the butter, place it in a bowl and massage in 3/4 of a teaspoon of salt. I forgot to do this part, and it made a world of difference. Don’t be like me and forget to add the salt.
If you’re like most sane people, you can just buy salted butter and skip to this step. Line an 8×8 inch baking pan with plastic wrap.

Measure out the butter– mine made exactly enough–

and press the butter into the lined pan,

then wrap tightly and place the wrapped butter in the refrigerator for at least 30 minutes.

Once the butter is in the refrigerator, return to the dough. Stir melted butter from the dough recipe into the sponge.

In another bowl, whisk together the last 2 1/2 cups flour and remaining sugar and salt.

Add the sponge to this mixture,

and stir it together until you have a soft dough.

I tried the spatula.

That really didn’t work, so I went for it with my hands.

And that didn’t work either, so I broke out the big guns.

That worked better, but it did strain the mixer, which surprised me a little. Sorry– I know the focus could be a lot better.

Knead for 5 minutes, and if the dough is still sticky add a little more flour until it is smooth and elastic. Mine never quite got to where I thought it should be, but I’m going to chalk that up to the fact that yeast-based dough seems to elude me. It doesn’t matter if it’s Challah bread, doughnuts, rolls, sticky buns, pizza crust, or hamburger and hotdog buns– if it has yeast in it, I’m probably not doing it correctly.
Once you’ve finished, then wrap the dough in plastic wrap and place it in the fridge. The original instructions said to make it 8 inches square, but the dough was pretty unyielding for me, so I did the best I could.

Make sure you don’t wrap it too tightly like I did. My dough popped through the plastic wrap. Oops. Refrigerate the dough for 30 minutes.
PART 2:
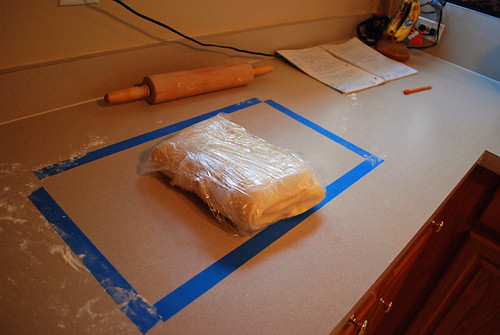
Now comes the fun part. After the butter and dough have chilled, remove them from the ‘fridge.
My wonderful husband masked a 20 inches long by 11 inches wide rectangle on the counter using painters tape as a guide.

Lightly flour this area, and place the dough here.

If you can, roll the dough into a square that is about 12 x 12 inches. Me– I couldn’t quite get a square, so do the best you can. Then unwrap the 8 inch butter square and place it diagonally in the center of the dough.

The dough will look like a square and the butter will be a diamond in the center of the dough. As you can see, mine does not. I put it down, snapped the photo, glanced at the photo, thought That’s not right, fixed it, and didn’t snap another photo.
Then fold the dough flaps in so that they meet in the middle.

Again, I couldn’t quite do this well. Maybe I need to take a class on baking.

You can moisten the ends to make them stick together if you need to.
Lightly sprinkle flour over the top, and then turn the dough over and carefully coax the dough into a rectangular shape.

You can periodically flip the dough and add a little more flour as needed to prevent sticking.

Roll from the center– it’s easier. Eventually, you’ll want that 20 x 11 rectangle.
Once you do achieve the 20 x 11, dust off any excess flour and then fold the dough into thirds, like a business letter. Right side of short end over to the left,

the left end over on top to the right.

Even up your corners and seal the dough. They call this a turn. You’ll want to mark these somewhere. It’s suggested you mark it in the dough. I didn’t quite understand how the mark wouldn’t disappear after rolling, so I just put a tally mark on my recipe notes.
Then turn it 90 degrees. Mine looked like a book, then it looked like a letter. Do another turn followed by the folding. Rewrap the dough loosely
and put it in the refrigerator for another 30 minutes. The butter gets pretty warm by this point, and you don’t want it to melt out.
Ultimately, you’ll want to complete four turns. This is what gives the dough all of those wonderfully, flakey, buttery layers. After you’ve completed the fourth turn, you’ll rewrap the dough and chill it for 1 hour to as long as overnight. Since the recipe called for dividing the dough in half and working with just one half at a time after this chilling time, I opted to do half after an hour and the other half the next morning. In the future, I’ll go with the next morning option. The dough was much easier to work with after the longer refrigeration time.
When it comes time to shape he dough, remember, you’ll use 1/2 half the amount at a time. I removed the whole dough package, cut it in half, and then rewrapped and returned to the refrigerator the half I was not using.
For the half you are using, sprinkle a little flour on the counter and your rolling-pin and roll the dough into a 12 x 18 inch rectangle.


I didn’t retape my counter, but I did put little marks down the second time– the first, I eyeballed it, which was a mistake because I messed up the dimensions. Trim the edges to get a clean-cut– this will help the croissants puff when baked.
Cut the dough into thirds vertically and half horizontally. You should get 6- 4 x 9 inch pieces. Mine first go was cut incorrectly. I wasn’t reading the directions, and I was trying to discuss return times from playing with my boy while being afraid that my dough would get dry on the counter (what do I know about bread and pastry?), so my attention was a little divided.


Feel like you’re on a roller coaster? Sorry about that.
Then cut each rectangle diagonally. You should have 12 large triangles. I had 16 small ones.

You can reroll the scraps to make more crescents. I took them and created a roll, which I eventually sliced into fourths,

baked, and slathered with honey butter. They were eaten before I had a chance to shoot the finished rolls.
Cut a small notch in the short end of the triangle. If you’re going to use a filling– which I didn’t do with this batch, but did with the second, you’ll put a small teaspoon of it at the base now. Then roll the triangle up, keeping the point under, and form your crescent shape.

Place the croissants on a lightly greased baking sheet; cover and chill them for 30 minutes. The recipe states that you can freeze them at this point. I didn’t with these.
Before baking, brush the croissants with 1 egg beaten with a tablespoon of water. Now, for me, the egg left them too crispy, so I did melted butter on the next batch– okay, and then I spread Country Crock of all things the next time. Of the three, the Country Crock turned out best. Next time, I’ll try oil.
The original recipes says to bake them at 425 degrees for 15 minutes, then reduce the heat to 350 and bake for 15-20 minutes more. For my tiny croissants, that was way too much.

I ended up baking them for about 5 minutes at the high temperature and then about 8 at the lower one. Even my second batch of normal sized croissants required shorter baking times at 10 minutes and 10 minutes.
As I said earlier, I saved the second half of the dough for the next morning. I was able to roll it much more easily,


and I managed to cut my pieces the correct size.

I made 6 plain ones and then the others, I filled with a mixture of crushed pecans, brown sugar, all spice, cinnamon, and honey.

I have no idea how much I put into my filling. I simply mixed until I was happy with the taste and consistency– call it an experiment…for science. Those croissants were my favorites.


With the leftover scraps from the second batch, I created some savory palmiers. I rolled the scraps into a small rectangle, then lined that with pepperoni and parmesan cheese,

then rolled one side up to the middle and one side down to the middle.

I then wrapped the log in foil and placed it in the freezer. A few hours later, I cut several thin slices from the roll and baked them at 400 degrees for about 10 minutes. They were delicious. I still have part of the log in the fridge, so I don’t know how many it made– I’d guess it’ll make about 30 based off of how many I sliced and how much is left.
Overall, I’m very happy with this recipe and the versatility that the dough seems to afford. Will I use it to make plain croissants again? Probably not. I can buy them much more easily. However, I will most definitely try to make the filled ones again.
They were delicious, and I probably won’t be able to find any exactly like what I created.

Final verdict: Completely worth the effort, and now I can cross another recipe from my Bucket List.
Yield: supposed to make 24 if you cut them correctly. I made 16 mini croissants, 4 pastry swirls, 12 regular croissants, and I don’t know how many palmiers because the rest are still in the freezer.


those look delish! so much better than the pillsbury ones that i had last week. 😉
Whew! I’m worn out from reading about your very successful endeavor….I’ll just buy them at Sam’s.
I think you have the right idea!
These look so yummy!
Yay!! I enjoyed reading along with your adventures in croissant-making. What an undertaking, but they looked like they turned out soooo good!! The cinnamon pecan ones made me drool!